This feature is available only for those that subscribe monthly to our Accounting and Reporting services.
If you are NOT a monthly subscriber and would like more information, please view: How to upgrade to add Accounting and Reporting features to my Autobooks account.
Autobooks gives you two easy ways to categorize your transactions!
-
Quick & Simple with Insights: Use our mobile-friendly Insights dashboard to quickly stay on top of all your categorizing activity, either from your desktop or from your phone. It’s a great way to keep things organized on the go.
-
Detailed & Flexible: Prefer to go at your own pace? Our traditional categorization feature lets you choose exactly which transactions you want to review and categorize when you're ready.
Jump to Insights Dashboard instructions
Jump to traditional categorization instructions
Categorize a transaction using our Insights Dashboard
We've made categorizing transactions easier for you to keep on top of. Our Insights Dashboard is both desktop and mobile-friendly, with easy navigation. Just go to Accounting, and you'll land on our Insights Dashboard. You can access our quick categorizer from the Your Profit & Loss section.
 If you have uncategorized transactions, the color bar graphs will not be completely filled. The action button for the section will also state how many transactions are outstanding.

Categorize using the Quick Categorizer
- Click the Categorize transaction button in the Profit & Loss section.
- The first uncategorized transaction will appear. You can categorize the entire amount, split the dollar amounts into multiple categories, or match the dollars to an existing payment (if the transaction is a deposit).
- With each categorization, you can assign a contact name (either a customer or vendor name). Just click the Contact link, then choose an existing contact name or create a new contact name in the moment.
- Optional: add a note to your transaction to help you remember the details later.
- Once you're done, click Save. If you have more transactions to categorize, the next outstanding transaction will display.

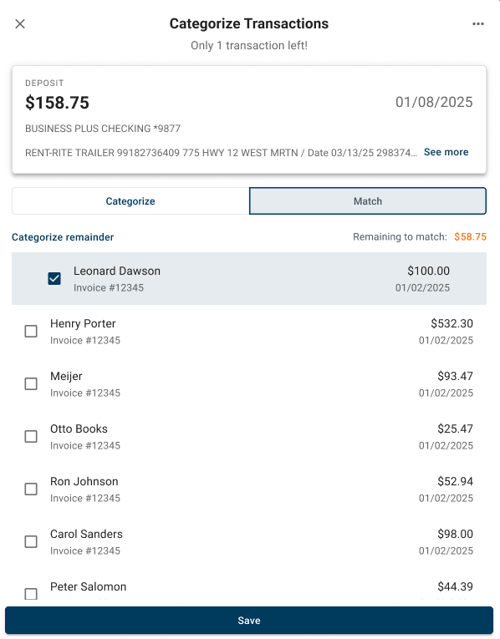
Matching a transaction to a payment
- For matching the transaction, click the Match option. A list of possible matches will appear onscreen. You can choose multiple items from the suggestion list, but the total of all items selected must equal the transaction dollar amount. You'll see any outstanding dollars you haven't accounted for in the Remaining to match area.
- When matching, you may assign any remaining dollars to a category. Click Categorize remainder to select a category for the remaining dollars.
- Once you're done, click Save. If you have more transactions to categorize, the next outstanding transaction will display.
Skip or Exclude a transaction
- You may want to skip over a transaction and revisit it later. To skip, click the three dots in the upper right corner of the transaction presented, then select Skip for now.
- To exclude a transaction from your accounting calculations, click the three dots in the upper right corner of the transaction presented, then select Exclude transaction. You must confirm this action before it's excluded. Once you exclude a transaction, this cannot be undone.
- Once you're done, click Save. If you have more transactions to categorize, the next outstanding transaction will display.

Check out our short tutorial:

Categorizing a transaction from your transactions list
- Navigate to the Accounting tab in the left-side menu.
- Select the transaction you wish to categorize from the list shown in the Transactions tab. Choose the Categorize Transaction option from the right-side menu.

- Select a category from the Category dropdown menu. You may split the transaction into multiple categories. Click Split categories to add a line item if the entire dollar amount should be applied to multiple categories.
Please note that debits to your account will bring up a list of Expense categories. Likewise, credits to your account will bring up a list of Income categories.
Note: if a transaction needs to be categorized to offset a previous debit or credit (e.g. a refund credit issued for a prior expense), please contact the Customer Care team for assistance!
- Click Save to complete your categorization.
Categorizing an invoice deposit
To categorize deposits from an invoice:
- Navigate to the Accounting tab in the left-side menu.
- Select the deposit transaction you wish to categorize from the list shown in the Transactions tab. Choose the Categorize transaction option from the right-side menu.

- Expand the Match Transaction section. A list of invoices that are a possible match for your deposit transaction will appear. If the invoice you're looking for doesn't appear in the suggestion list, you can search a data range or customer name in the search area to find a match.
 4. Check the invoice(s) that make up all or part of the deposit transaction, then click Save.
Note: If the deposit amount is more than the invoice balance, you must categorize the remaining dollar amount as an expense type by using the Categorize Transaction section.