Create and send an invoice
Creating an Invoice
Autobooks allows you to create invoices (both one-time and recurring) and send them via email. Invoices can be paid electronically by your customers with a credit card, debit card, or by bank transfer (ACH).
To create a new invoice:
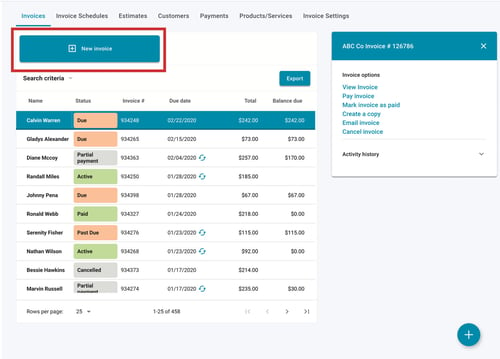
- Click the Invoices tab
- Click the New Invoice button

- Complete the desired fields within the invoice template. Your progress is automatically saved as a draft in your Invoice list.
Please note that fields marked with a red asterisk* are required.

- Customer – This is the person or business that will receive this invoice. Click on this field to view a list of previous customers to choose from OR add a new customer.
If you would like to learn more about adding a customer,
please click here to view: How to Add a Customer article - Due Date – This is the date that payment of this invoice from your customer is due.
- Make Recurring - This toggle will enable options for creating a recurring invoice. Click here to view the article Creating a Recurring Invoice.
- Product/Service – This is the product your business is selling or the service your business is providing as part of this invoice. Click on this field to select the Product/Service you are selling. You may add new products/services from here if needed.
If you would like to learn more about how or why to add a new Product / Service for your business, please click here to view: How to Add a Product/Service article - Quantity (Qty) – Indicates how many items of the product you are selling to the customer.
- Price – The dollar amount you are charging for the Product/Service. This field will default to the standard price of the product, but you can edit the dollar amount here.
Please note that the Amount field is an automatic calculation that is based off of the Quantity times unit Price. - Description (optional) – Add more details about a specific Product/Service here.
- Add line item (optional) – You may itemize additional Products or Services by clicking this link. Click the Trash icon at the right of the line item to remove it.
- Add Discount - You may add a discount (either a percentage of the total invoice OR a flat dollar amount) by clicking this link.
- Add Service Charge - You may add a service charge (either a percentage OR a fixed amount) on a per-invoice basis. Click here to read more about Adding a Service Charge to an Invoice.
- Add/Edit sales tax - If you have not globally enabled sales tax within your invoice template, click
- Add sales tax to enable it. If you have enabled sales tax, you may edit the percentage rate.
- Click Edit sales tax to change the sales tax rate for this invoice.
If you would like to learn more about how to enable sales tax, please click here to read more.
- Message (optional) – Add a message to your customer in this field.
- Attachments (optional) - Add as many as 20 file attachments to your invoice. File size for each attachment is limited to 25MB. Just drag/drop your files to the template, or click the Attachment box to upload a file (if using a mobile device, click the Add Attachments link).
Sending an Invoice
After you have completed the necessary information above, you will need to take one of the following steps to finish the invoice creation process:
- Click Send Invoice to email this invoice to your customer.
Please note that if the customer does not have an email address on file, you will be prompted to enter one before you can send out this invoice.

- Click the Preview Invoice option to see what your customer will see when receiving this invoice.
- Click the Save to list option to fully create this invoice, but not send it out via email to the customer in question.
Please note that once an invoice is fully created (either sent through Send Invoice or Save to list options), it cannot be edited. If you need to change an invoice after it has been sent or saved to the invoice list, you can easily copy this invoice from the Invoice List page and then make the necessary changes.
To learn more about the Copy Invoice feature, please click here to read the How to Copy an Invoice article.