Autobooks allows you to create invoices (both one-time and recurring) to send to your customers via email. These invoices can be paid electronically with a credit or debit card or by an ACH (bank account transfer) payment.
Please note this article is showing the recurring invoicing process. To learn how to create a one-time invoice, please click here to review: Create and send a new invoice.
How to create and send a recurring invoice
When you're creating a recurring invoice, you're setting up a schedule that will send an invoice to your customer on a regular basis.
This process begins by first creating a standard invoice:
- Access the New recurring invoice button from either the Invoices tab or the Invoice Schedules tab.
- Click the New recurring invoice button (you may also find the New recurring invoice button on the Invoices tab).

Please note that fields marked with a red asterisk* are required
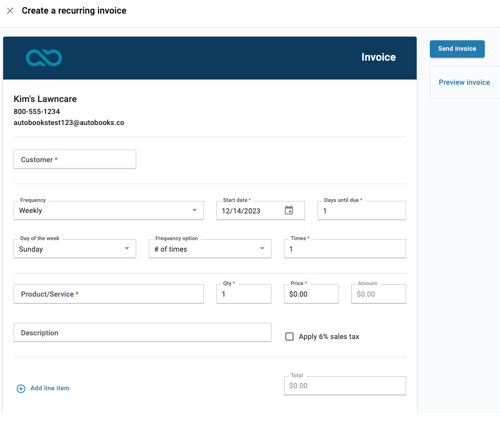
- Customer – This is the person or business that should receive this invoice. Click on this field to bring up a drop-down menu where you can search for the appropriate customer to bill. If the customer in question has not yet been added into Autobooks, you can do so by clicking the New customer option from this menu.
If you would like to learn more about adding a customer,
please click here to view: Add a new Customer
- Schedule - Weekly/ Bi-weekly/ Monthly/Quarterly/Annually. As you build the schedule from the options below, the text above your options will summarize the schedule you've selected.
-
- How often? - click the schedule cadence you wish to use for the recurring invoice.
- On which day/day of the month?- For Weekly, Bi-weekly, or Monthly options you will choose the day of the week or the day of the month you would like your invoice sent.
- Which month? - For Quarterly or Annual options, you will select which month the invoice will be sent during the schedule.
- How long? - Select Forever to run the schedule with no defined end date, or select End Date to choose when the schedule will stop.
- Payment terms - Type in the number of days your customer will have to pay your invoice from the date they receive it. Ex: Type in "2" to give your customer two days to respond to your invoice with a payment.
-

- Product/Service – This is the product your business is selling or the service your business is providing as part of this invoice. Click on the Product/Service field to see a list of your existing products within Autobooks.
By default, only one product/service field will display. You can add additional products/services for an itemized invoice by clicking the Add line item option a bit farther down.
If you would like to learn more about how or why to add a new Product / Service for your business, please click here to view: How to Add a Product/Service article
- Quantity (Qty) – This field indicates how many of that product the customer purchased.
- Price – Enter the amount for the Product/Service you are providing.
Please note that the Amount field is an automatic calculation that is based on the Quantity times unit Price.
- Description (optional) – If you need to add in more details about a specific Product/Service, you can do so in this field.
- Add line item (optional) – If there is a second (or third, or fourth, or...) Product or Service that you need to add to this invoice, you can insert a new line item by clicking this button.
- Edit sales tax (optional) - Select this link if you need to adjust the sales tax percentage for this invoice.
- Message (optional) – If there is anything else that you would like to relay to the customer receiving this invoice, you can add longer messages in this field.
After you complete the necessary fields, click the Send invoice button to finish the creation of this recurring invoice schedule. You can click the Preview invoice option to view what your customer will see when opening this invoice.
Please note that since recurring invoices cannot be created for the same day, the earliest this schedule would start (and subsequently send out an invoice) would be the day immediately following the invoice creation.