Enrollment and Payment Enablement with Autobooks
Ready to start getting paid? Here's how to begin.
Step 1:
Click on Autobooks or an Autobooks payment tool (Send an Invoice, Payment Link, Checkout Pages, or Tap to Pay) within online banking. If you're not able to locate us, reach out to your financial institution for assistance.
Read and accept our Terms & Conditions, then select a checking account for Autobooks to deposit your customer payments and withdraw fees (you'll only need to select an account if you have multiple checking accounts for your business or organization).
NOTE: Autobooks can be connected to only one checking account. Autobooks cannot be connected to other account types.
Step 3:
You'll now be within Autobooks. You can choose to begin your application to accept digital payments or skip applying for now to explore our tools.
NOTE: You won't be able to process a payment until your application is completed. Our merchant application process is required to receive payments using Autobooks tools.
Autobooks will gather information about you and your business/organization and use that information to review your application to accept digital payments. While Autobooks does have some information about your business through our partnership with your financial institution, we may require additional information that wasn't provided to us by your financial institution.
Step 1:
Click on Accept Payments from anywhere inside of Autobooks, or click Get Started from the enrollment pop-up.
Answer the questions displayed. If you want to defer any particular question in the moment you can, but all questions MUST be answered before Autobooks can approve your business/organization to take payments through our tools.
Deferred questions
If you defer a question, it will appear at the end of the question process flow. No question can be completely skipped.
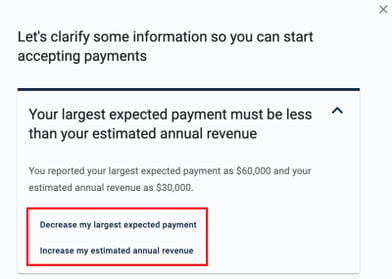
We may ask you to clarify something if your answer conflicts with other information.
Select the way you wish to clarify your answer from the choices listed if you're asked to clarify. Here's an example of what that might look like:

NOTE: if you close the questions window or exit Autobooks before you've answered everything, your progress is saved. Just return to Autobooks within online banking to return to your application in progress.
Once all questions are answered, Autobooks will review your application information to process digital payments. During this process, we'll keep you informed every step of the way. Click here to read through messages you may see in-app or receive via email during this time.
You may be asked to reverify certain personal or business information, if what we've received from your financial institution seems in conflict with your application. In this case, we'll ask you to retype a few basic pieces of information in a pop-up that looks like this:

Once you've retyped the information, click Confirm to submit this back to Autobooks.
Once we've reached a decision on your application, we'll notify you via email (you'll also see messages within the Autobooks application).
You may need to provide additional information during our review. Click here to learn more.
NOTE: Not all financial institutions offer our Tap to Pay option. Please contact your financial institution to request they offer Tap to Pay.
There are additional steps for a business/organization when enabling Tap to Pay. These steps will be displayed to you within Tap to Pay after you are approved to process payments.
Connect an Apple ID to Tap to Pay. You can choose to connect the Apple ID that is currently associated with the iPhone you are using in the moment OR use an Apple ID from another iPhone. Have your Apple ID user name and password handy to complete this step.
While the Apple ID connection is being established with Apple, you'll view a short tutorial video on best practices in taking a payment through Tap to Pay.
NOTE: This step may take anywhere from 30 seconds to 2 minutes. Do NOT click away from Tap to Pay while the connection is being established.
Step 3:
The Apple ID connection is complete and you can begin taking payments through Tap to Pay.
You will be initially enrolled in our Essentials plan, which includes our all of our payment processing tools. Click here to learn how to change or upgrade your plan type.